喬叔的 Elastic Stack 專業教育訓練
  • 喬叔的 Elastic Stack 專業教育訓練
  • 🧑關於喬叔 (Joe Wu)
  • Elastic 課程公開班
    • 🎯Elasticsearch 基礎實務班
      • 💯學員課後回饋
    • 🆕Elasticsearch 進階運維班
      • 💯學員課後回饋
    • Elasticsearch 進階開發班
    • Elastic Stack 基礎實務班
    • Elastic Observability 基礎實務班
    • 📩課程許願池
  • 技術分享
    • 📗喬叔帶你上手 Elastic Stack
      • 前言
      • Elastic Cloud 如何建立 Deployment
        • ES Node 的種類
        • 配置的選擇
      • Index 建立前你該知道的
        • ES Index 如何被建立
        • ES 的超前佈署 - Dynamic Mapping
        • ES 的超前佈署 - Index Template
        • ES Index 的別名 (Alias)
        • 管理你的 Index - Kibana Index
      • 管理 Index 的 Best Practices
        • Shard 的數量與 Rollover & Shrink API
        • 三溫暖架構 - Hot Warm Cold Architecture
        • Index Lifecycle Management (ILM)
        • Rollup
        • Transform
        • Snapshot Lifecycle Management (SLM)
        • 總結
      • Elastic Cloud 比免費版還多的功能
        • Elastic Stack 的方案比較與銷售方式
        • Centralized Beats Management
        • Centralized Pipeline Management
        • Watcher
        • Elasticsearch Token Service
        • Multi-stack monitoring & Automatic stack issue alerts
      • 向 App Search 學習怎麼用 Elasticsearch
        • 揭開 App Search 的面紗
        • Engine 的 Index Settings 篇
        • Engine 的 Mapping 篇
        • Engine 的 Search 基礎剖析篇
        • Engine 的 Search 進階剖析篇
      • Elasticsearch 的優化技巧
        • Indexing 索引效能優化
        • Searching 搜尋效能優化
        • Index 的儲存空間最佳化
        • Shard 的最佳化管理
      • 完賽心得
    • 📘喬叔帶你上手 Elastic Stack - 探索與實踐 Observability 系列
      • 前言 & 淺談 Observability
      • Elastic 的 Observability 解決方案
      • Uptime - 掌握系統的生命徵象
        • 我們要觀測的生命徵象是什麼?
        • 使用 Heartbeat 收集系統生命徵象數據
        • 透過 Kibana 觀看心電圖及設定警報
        • 使用合成監控 (Synthetics Monitor) 從使用者情境驗證服務的運作狀態
      • Metrics - 觀察系統的健康指標
        • Metrics 與 Metricbeat 的基本介紹
        • 使用 Metricbeat 掌握 Elastic Stack 的健康狀態
        • 使用 Metricbeat 掌握 Infrastructure 的健康狀態 Host 篇
        • 使用 Metricbeat 掌握 Infrastructure 的健康狀態 Docker 篇
        • 使用 Metricbeat 掌握 Infrastructure 的健康狀態 Kubernetes 篇
        • 使用 Metricbeat 掌握 Infrastructure 的健康狀態 AWS 篇
      • Logs - 挖掘系統內部發生的狀況
        • Logs 與 Filebeat 的基本介紹
        • 使用 Filebeat 應該要了解的設計細節與原理
        • 透過 Filebeat 收集 Elastic Stack 中各種服務的細節資訊
        • 透過 Filebeat 收集 Infrastructure 中各種服務的細節資訊
      • Traces - 觀察應用程式的效能瓶頸
        • Elastic APM 基本介紹
        • 使用 APM-Integratoin-Testing 建立 Elastic APM 的模擬環境
        • 如何在 Kibana 使用 APM UI
        • 使用 APM Server 來收集 APM 數據
        • 透過 APM Agents 收集並傳送後端服務運作的記錄
        • 透過真實使用者監控 (RUM, Real User Monitoring) 來改善使用者體驗
      • 建立結構化的 Log
        • Elastic Common Schema 結構化 Log 的規範
        • Elasticsearch Ingest Pipeline 資料 Index 前的轉換好幫手
          • 基本介紹
          • 各種常用的 Processor
          • Enrich 資料與例外處理
      • 有效的使用 Observability 的資料
        • 透過 Machine Learning 發現異常的問題
        • 使用 Kibana Alerts 主動通知異常狀況
        • 資料的生命週期管理
        • 使用 Elastic Observability 追縱及觀察問題的心得
      • 完賽心得
    • 😀Elasticsearch 技術分享小品
      • 🤖Elastic 與 AI
        • Elasticsearch Inference API 讓我們直接在 ES 裡運用 OpenAI Completion API
    • 🎥線上分享
      • 喬叔 Elasticsearch Index 管理與效能優化技巧
      • Elastic Certification 認證經驗分享
    • 🛠️workshop
      • 如何在 Elasticsearch 實現敏捷的資料建模與管理 @ DevOpsDays 2023
        • 工作坊實作內容
      • Elastic Observability 實作體驗坊 @ DevOpsDays 2022
        • 行前準備
        • 工作坊實作內容
      • 當 Elasticsearch 搜尋引擎遇上 AI @ HelloWordDevConference 2024
        • 投影片
        • Elasticsearch 環境準備
        • Google Colab 環境準備
        • 工作坊操作說明
        • ElasticSearch Relevance Engine (ESRE)
    • ⬆️Elastic Stack 版本升級記錄
      • 🔍Elasticsearch
  • 其他專業服務
    • 👩‍🎓企業包班 | 企業內訓
    • 👨‍💼顧問服務
    • 🈺專案合作
    • 🧩Elastic 授權代理
  • 相關連結
    • Facebook 粉絲頁
Powered by GitBook
On this page
  • 前言
  • 進入此章節的先備知識
  • 此章節的重點學習
  • Shard 的重要觀念
  • Index 的管理方式
  • Index 的數量太多的成本?
  • 針對 time-based indices 的管理方式 - Rollover Pattern
  • 參考資料
  1. 技術分享
  2. 喬叔帶你上手 Elastic Stack
  3. 管理 Index 的 Best Practices

Shard 的數量與 Rollover & Shrink API

Previous管理 Index 的 Best PracticesNext三溫暖架構 - Hot Warm Cold Architecture

Last updated 2 years ago

前言

當我們將資料 Indexing 進入 Elasticsearch 後,隨著時光的飛逝,我們 Index 裡的資料通常也會愈來愈多,這時如何有效的管理資料就是一件很重要的事,這個主題的文章會來介紹 Index 管理的 Best Practices,這篇文章會著重在 Index 中 Shard 的數量配置方式及優化的方法。

進入此章節的先備知識

  • 知道什麼是 Elasticsearch Index、Alias、Index Template。

  • 初步了解 Lucene, Shard, Segment Files。

此章節的重點學習

  • Shard 的數量該怎麼設定。

  • 隨著時間的變化,如何透過 Rollover API 及 Shrink API 來優化 Elasticsearch 中的 Indices。


Shard 的重要觀念
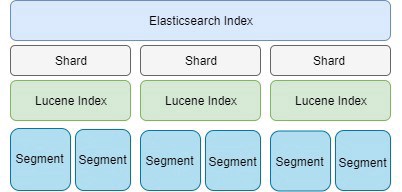
elasticsearch shard

在一開始我們說明一下 Shard 的幾個重要的觀念:

  • Shard 是 ES Cluster 中切分資料來儲存的最小單位,裡面是透過 Lucene 管理的一群 Segment Files,也就是 Lucene Index。

  • Shard 的大小與數量:

    • 最大多大?: 沒有一定的限制,主要是依照 Elasticsearch Cluster 硬體的性能來決定,早期官方文件是寫建議 10G,但忘了從哪個版本開始(應該有二、三年前),文件上已改成 20~40G,隨著硬體規格的成長、Elasticsearch 版本演進時效能不斷的優化,這個數字會需要實際測試才知道,以我實際的經驗,200G以上的 shard 也有遇到過。

    • 最小多小?: 如果要設多個 shard 的話,最好不要小於 1G,否則這時候切 shard 的好處太少,不如不要切 shard。

    • 數量多的好處?: 數量愈多的話,好處是資料量非常大時可以分散到多個 Node 去儲存、又或是有大量的 Indexing 的需求可以讓多個 Node 去分擔,若是單一 Shard 的儲存空間足夠,又沒有大量 Indexing 的需求時,應該讓 Shard 大一些,並且數量少一點會比較好。

    • 數量少的好處?: 數量愈少其實處理搜尋的效能會較好,但取捨是當 Cluster 要 Rebalancing 時,一個巨大的 Shard 要搬移的成本很高。

Index 的管理方式

若你的資料量是固定的、或是成長非常緩慢的,請直接依照上述 shard 的觀念、硬體規格、成長規劃來設定 shard 的數量,以下著重在介紹隨著時間成長的資料的 Index 管理方式。

隨著時間增長的資料,資料要能分散存取的話,官方建議使用 time-based indices 來進行資料的管理,而不是在一開始設定大量的 shard 數量來期待之後資料的成長,因為 shard 的數量在建立 Index 時設定好之後,就不能再修改。

Elasticsearch 6.x 版之前,預設的 shard 數量是 5,但是從 7.x 版開始,預設的 shard 數量已改成 1,官方建議使用 time-based indices 來處理隨時間成長的資料。

Index 的數量太多的成本?

Index 的資訊是存在 Cluster stats 中,如果 Index 數量太多 (特別是 Mapping 欄位又很多時),會讓 Cluster stats 變很大,這會佔用 JVM heap size,也會造成 update 這種需透用到 cluster stats 資訊來確保處理一致性的請求效能變慢。

針對 time-based indices 的管理方式 - Rollover Pattern

一般這種資料我們的期待與使用情境如下:

  • 在 indexing 大量資料時,為了有較好的效能,我們一開始會將 shard 數量提高。

  • 當資料趨近穩定、不太會變動時,我們為了要有更好的查詢效能,我們會希望 shard 的數量愈少愈好,但也不要到太肥大的狀態。

  • 有時可能覺得一天一個 Index 會比較好照時間來管理過期的資料,但每天的資料量可能不一定,Shard 的數量又不見得都適合套用同一套規則。

因此這時官方的 Rollover & Shrink 會是很好的解決方案,這個 Rollover Pattern 的基本運作如下:

  • 定一個 indexing 新文件專用的 Alias ,並將他指到目前 active index。

  • 定另一個 searching 用的 Alias,指定所有不論新、舊的 indices。

  • active index 可以指定有很多個 shard,讓寫入的效能能最佳。

  • 當 active index 資料量達到一個條件、或是時間過太久了,會進行 Rollover,產生一個新的 index 成為 active index,並把 indexing 用的 alias 指向他。

  • 舊的 index 被搬到 code node,並觸發 Shrink 的動作,將他轉成單一 shard 的 index,並且觸發 forced-marged 和 compression ,以進行資源的優化。

以下分別針對 Rollover API 及 Shrink API 來示範 Rollover Pattern 的實作:

Rollover

建立一個 index - logs-000001 與指向他的 alias - logs_write:

PUT /logs-000001 
{
  "aliases": {
    "logs_write": {}
  }
}

使用 Rollover API 建立 超過7天 或 滿1000筆文件 要觸發自動 rollover:

POST /logs_write/_rollover 
{
  "conditions": {
    "max_age":   "7d",
    "max_docs":  1000
  }
}

Rollover 的規則,會依照 index 名字後有 - 而且接著數字,就會接受這是要 Rollover 的 index,但長出來新的 index 會依照這邊的定義,會是六位數並且會補 0 的格式。

例如當筆數滿 1000 後,會產生新的 index logs-000002。

若新的 index 不是這個名命的規則,可以明確的指定名字。

POST /my_alias/_rollover/my_new_index_name
{
  "conditions": {
    "max_age":   "7d",
    "max_docs":  1000
  }
}

Shrink

Shrink 的 API 主要的目的就是把 index 的 shard 數量變少,而變少的規則,必需是原來數值的因數,例如原本是 8 ,那只能 shrink 成 4 或 2 或 1、原本是 15 的話,只能 shrink 成 5 或 3 或 1。

運作機制如下:

  • 建立一個新的 index,其設定會完全照之前的 index,只有 shard 數量是變少的,此時 index 的狀態會先保持 _close。

  • 透過 OS 的 hard-links 來合併 shards ,如果 OS file system 不支援,會直接用複製的方式將 shard 複製到新的 index 裡。

  • 最後再將新的 index 重新 open。

Shrink API 如下:

POST my_source_index/_shrink/my_target_index

另外也可以宣告一些類似 create index API 能指定的參數:

POST my_source_index/_shrink/my_target_index
{
  "settings": {
    "index.number_of_replicas": 1,
    "index.number_of_shards": 1, 
    "index.codec": "best_compression" 
  },
  "aliases": {
    "my_search_indices": {}
  }
}

透過這些設定,就能指定 shrink 成特定數量的 shards 了。 (不過要記得必須是原來 shard 數量的因數才行。)

參考資料

📗
官方 Blog - How many shards should I have in my Elasticsearch cluster?
官方 Blog - Manging Elasticsearch time-based indices efficiency
官方文件 - Avoid oversharding
Optimizing Elasticsearch Stronger Better Faster